I've been dancing around the house listening to a mix of Christmas music and the awesomeness that is mr. antonia and remembered that I never shared our wreath(s)! Shame on me. So without further ado...
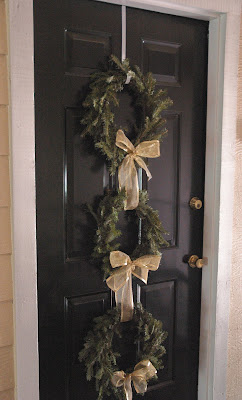
our front door wreaths!
 I don't like paying a lot for something that is going to die (just ask my mom to recap our conversations about wedding flowers :) ) and these are no different. Wreaths die. (I don't like fake flowers or fake greenery so I'm not including those in this statement. Want something that isn't going to die? Try ornaments. Or pinecones. But please. no. fake. plants.)
anyhow. We'll start with the greenery. I went to our local nursery turned tree farm and made friends with guys who only work there over the break and explained that I didn't need garland exactly, just evergreen branches. They shared the secret that I could take as much of the "leftover" evergreen that they cut off of trees for free. Free's nice. Esp. given that the garland was $3 a foot and my mantle and wreaths would need at least 20 ft. Not sure about you, but I would much rather by a dress, or shoes or something fabulous for under the tree with that $60 than buy cut garland that would just die and be thrown out come December 28th-ish.
Next I ran by the craft store to buy something to use as a frame. I ended up using embrodiery hoops because I didn't feel like paying over $3 per wreath wire frame thing when these little babies were like $3 total. And wasn't there a huge blog trend with decorating with these sewing circles? Yea, I thought so. So if you were trendy and got on board with that, you already have some of these lying around your house begging to be made into something beautiful.
 step 1: get everything together and then cut off little pieces of evergreen from the big branches
After buying green floral wire I was set. I covered the floor of our living room with kraft paper and went to town. (Have I mentioned I was sick with a horrible cold when I decided to make this? No? Well I was. Hence I had the time to sit and do this since medicine makes me loopy and awake and boredom forced me to find something simple to keep me occupied in between bouts of sneezing and coughing. Honestly, I don't really expect people to have hours to sit and make wreaths normally, but since almost everyone gets the flu or a bad cold, after you mistakeningly think you're "better" so you try to do a lot and end up back home feeling badly all over again, take that time and make something like this :) )
 step 2: put pieces on frame and attach with floral wire
Word to the wise: plan these out some. Have everything go in one direction. Layer the branches to make the wreaths look fuller, and don't worry if it's a little off- that's what makes them natural looking.
 Step 4: Keep over lapping branches, holding in place with wire, and slowly circle the entire hoop.
Step 5: Remind yourself you really should get a manicure after working with sap.
Step 4: Keep over lapping branches, holding in place with wire, and slowly circle the entire hoop.
Step 5: Remind yourself you really should get a manicure after working with sap.
 Step 6: fill in patches with more branches (don't forget to attach with wire!) to make it look full. I actually took this one appart and started over since the branches didn't go in the same direction. (hence the advice on making sure you start that from the beginning.)
Step 7: (sorry no pictures- I only have 2 hands) Loop ribbon between 2 wreaths and tie it off in a big bow. Arrange so the bow sits on the base of the top wreath.
Step 8: repeat so all 3 wreaths are now tied together. Oh! and make one extra bow.
Step 9: tie extra bow onto base of bottom wreath.
I didn't make the extra bow at first and it looked off. Just another lesson learned. After this, you're done. Hang up, step back, take pictures, talk about it on your blog, post on facebook... you know, whatever makes you feel good :)
Happy Tuesday everyone!

 via douglas rosin


