From the Studio

From the Studio: Lemon Curd Thank You gift

via courtney khail

I went a little overboard with the lemon buying a few weeks back and knew I had to make something versatile enough to use in a lot of different things, but also that used up a decent amount of lemons because they were taking over the kitchen. And even though the hubs isn't the biggest fan of it, I decided to try my hand at lemon curd. Full disclosure, I only wanted to make it because of it's beautiful color. Well that and I'd also made a ton of shortbread cookies a few days before that were screaming for something sweet to dunk them in.

It really wasn't hard to make at all, but seeing as I ended up with a good 4 cups of it and I only needed about 1/2 a cup, I figured I'd turn the rest into a thank you gift for a friend. Sure you can give someone a card (might I suggest one of mine perhaps?) and call it a day, but why not give them a card AND an awesome tasty treat?

Side note, always test the food before giving it to someone. Last thing you want to do is brag on your chocolate chip cookies and then accidentally give someone a batch where you left out the sugar or something horrible like that. Though that would be hilarious...

via courtney khail

For this, I simply made the lemon curd (recipe here) and poured it into a glass mason jar. While the curd cooled, I cut a piece of white fabric just a little larger than the lid and then painted a bright yellow lemon onto a piece of watercolor paper for a tag. Once the paint dried, I wrote "thanks!" in black calligraphy ink, punched a hole at the top, and threaded through piece of yellow ribbon. After the curd was cool enough for me to handle, I used the yellow ribbon to the fabric around the top of the jar and made sure the tag faced outward.

Simple, tasty, and thoughtful- all rolled into one.

Although not necessary, after you've packaged the lemon curd, feel free to then convince yourself you need to go buy a vintage yellow gingham apron to photograph said lemon curd on top of. Share photos with friends and family who of course will remark how cool/thoughtful/creative you are. Upload to Pinterest to show the world how creative you are. Maybe even wear apron when you hand deliver the lemon curd to a friend. Then when they remark that you match, remark that you "just threw this old thing on" to keep from getting dirty and act like you hadn't even thought of it.

P.S I did buy a vintage gingham apron, but the rest is sarcastic. Unless you actually follow those steps and then you are awesome and I'd love for you to tell me how it went.

From the Studio: kim and courtney cook cauliflower

watercolor via courtney khail

photograph via kim taylor

For this month's Kim and Courtney Cook (see how it started here), I picked cauliflower (mostly because I had a head of it in the refrigerator and really wanted to try out a new soup) but little did I know how hard it is to actually paint and/or photograph cauliflower. Seriously, I'm lucky Kim is my friend because otherwise she probably wouldn't be speaking to me now otherwise.

Note to self, never pick a white food for an art project.

That said, I think we both did pretty well despite how difficult the subject matter seemed. Kim's photos rock as usual (see them all here) and the recipes are awesome. (I made this soup for two days straight, and then made another batch when the hubs had a dinner meeting. It's really that good.) Let us know what you guys think!

Cauliflower Soup

Cauliflower Soup

2 strips of bacon

1 small onion

2 garlic cloves (minced)

1 carrot

1/2 stalk of celery

1/2 head of cauliflower

1 Tbs extra virgin olive oil

1/2 Tbs parsley

1/2 Tbs thyme

2 cups stock (I used beef, but chicken would be fine)

2 Tbs butter

2 cups half and half (or milk)

3 Tbs flour

1/4 cup Parmesan

salt and pepper

Directions:

1. Cut up bacon and cook in soup pot (I used a Dutch Oven, but anything that can hold soup would be fine.) Remove and wipe out the pan. (You don't have to wipe it all out, you just want to get some of the fat out so you can feel like this is "healthy.")

2. Dice onion, carrot, and celery

3. In the same pot as the bacon was cooked in, cook the onion in olive oil until translucent.

4. Add carrots and celery and cook another 5ish minutes

5. Add cauliflower, parsley and thyme and cook for 15ish minutes

6. Pour in stock, bring to a boil and then simmer.

7. Meanwhile, in a sauce pan melt the butter.

8. In a small bowl, whisk flour into 1 cup of half and half, then whisk the mixture into the melted butter.

9. Remove from the heat and whisk in remaining cup of 1/2 and 1/2.

10. Once it's all whisked together an there aren't any lumps, add to the soup

11. Simmer 15-20 minutes, then season with salt and pepper.

12. Pour into bowls and serve with toasted Italian bread and a side salad

If you like silky soups (or have a sore throat and just want something soothing) you can blend it until it's the consistency that you'd like. Promise it tastes just as amazing both ways.

Enjoy everyone!

From the Studio: DIY Watercolor Shamrock Bouquets

St. Patrick's Day is just around the corner and given that I'm Irish (or partly- have a little French and English too) I've always loved the holiday. It may be because for as long as I can remember my dad, my sister, and me walked in the parade (complete with Irish American Heritage sashes on) as my mom waved from the sidelines. Or maybe it was because the whole day was filled with merriment, laughter, and good food (I for one love corned beef and cabbage with boiled potatoes.) Whatever it was, the day holds some of my fondest childhood memories and therefore still makes me all happy when it finally arrives. Because of that, I thought I'd play around with painting different compositions of shamrocks and share my favorite with you all. In the end, I created a shamrock bouquet (complete with a twine bow) for you all to share the luck of the Irish with your friends and family. Enjoy!

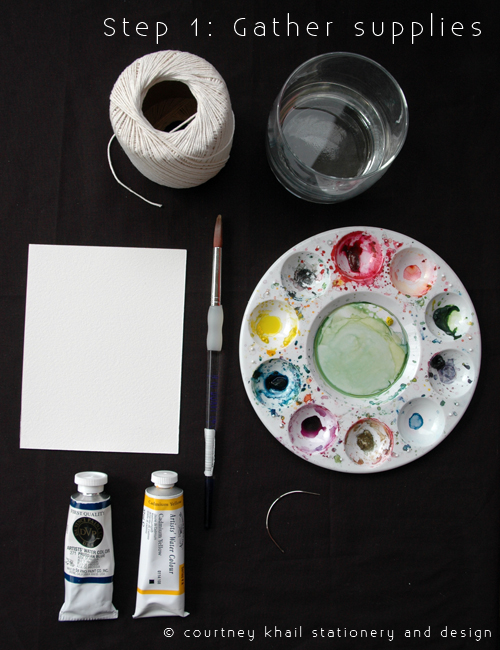
Step 1: Gather your supplies. You'll need blue and yellow paint (or just green if you want to take the easy way out,) water, a brush, a piece of watercolor paper, twine, yarn, or string, and a needle. I used an upholstery needle because the eye was large enough for my twine and the needle was sturdy enough to poke through the paper.

Step 2: Make green paint (by mixing yellow and blue together) and paint a shamrock. I know we all learned this in elementary school, but in case that was just my school, a shamrock is simply 3 (or 4) hearts connected together at their base. Let it fully dry before continuing. (This is when I did a load of laundry)

Step 3: Add some more yellow to the green paint (just to add some interest) and paint a second shamrock. Let dry (and if you're me, put the clean clothes in the dryer.)

Step 4: Add some more blue this time, and paint a third shamrock. Don't be afraid to let them overlap. It creates a really pretty layering affect.

Step 5: After everything is dry, thread your needle. Coming from the back of the card, poke the twine through the paper just to the left of the stems.

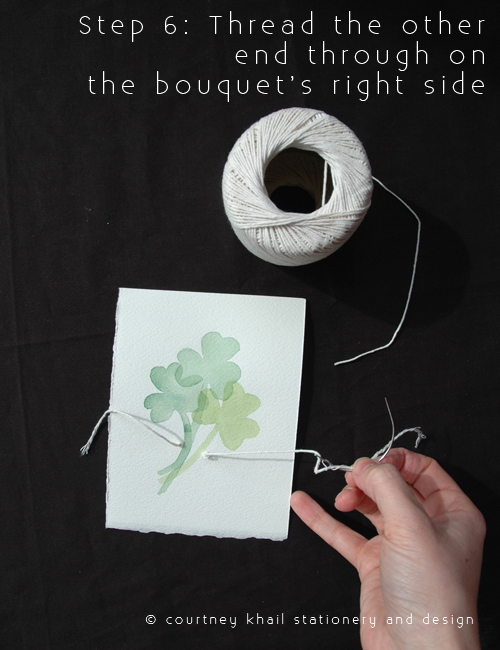
Step 6: Thread the other end of the twine and repeat- coming through on the right right of the stems.

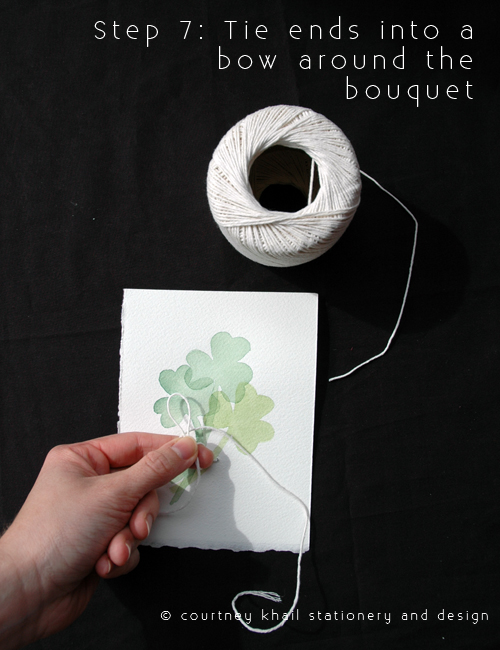
Step 7: Tie the two ends into a bow and cut any extra twine that may be there.

Step 8: Write a message and send off to someone who needs some luck. (Might I even suggest a gold or green envelope? Because that would make this even better. Oh! Or maybe package everything up and fill it with gold chocolate coins and rainbow colored shredded paper. The possibilities are endless...)

From the Studio: Wedding Certificate

copyright courtney khail stationery and design

I can't show the show the whole certificate (I promised my clients,) but I did want to show a close up of the hydrangea design I painted for them. They wanted to stick with greens and purples, so I had fun alternating between the two, combining colors, and letting the paint just kind of flow. I love when my clients give me a lot of freedom because amazing things can happen. Plus, I'm so type A that I refuse to let anything less than absolutely perfect leave the studio so it's kind of a win-win for all involved. Isn't this pretty, though? I really enjoy how vibrant and modern it became.

And I know you can't see them, but they wrote their own vows and the emotion behind them brought me to tears. There is something so amazing and humbling about being able to share in such a personal moment. There I was, inking in the words they were going to exchange before entering into marriage. The words that promised they would stand by each other, support each other, and love each other always. I couldn't help but feel so lucky to be able to be apart of that and so overjoyed that these two people found each other.

I'm also the person who has to hold back tears at weddings. I can't help it. The moment the couple looks at each other and starts vowing to be a team my eyes just fill up.

From the Studio: kim and courtney cook beets

watercolor by Courtney Khail

photograph by Kimberly Taylor

As you've probably noticed, today's from the studio is a little different than the rest. That's because today is the first day of a new monthly collaboration called "kim and courtney cook" between me and Kim of Kimberly Taylor Images. I met Kim at Alt this year and right away it felt like I'd known her for years. I could go on and on about how awesome she is (because really, she rocks) but this is already going to be a long post, so I'll get to the main things you need to know. One- she is an extremely talented photographer. Like, REALLY REALLY talented. Two- she loves to cook (and looking at her photos, she's pretty talented at that as well.) And Three, as mentioned before, she's super cool.

After getting home from Alt, I started thinking of things I'd like to do this year (resolutions I guess) and on the top of that list I had: paint more for myself and experiment with new recipes and ingredients. You see, I love cooking and before now I never could find a way to bring that love onto the blog. So why not combine those two goals and share the process? And on that note, why not see if one of my super talented friends would like to do this with me? So that's exactly what I did. Luckily for me, Kim was on board!

Here's how it works. Each month we pick an ingredient, make something that uses the ingredient and then create art based on the ingredient or the dish itself. After that, we share what we did with you all! Sounds like fun right? We thought so too.

This month, we chose beets and to be honest, I've never liked beets. I always thought they looked pretty, but I didn't enjoy the flavor. Of course, I refused to tell Kim that when she suggested beets because I wanted to make myself try something new and I knew that she was too nice to make me cook something I didn't like. So I kept my mouth shut and dove in. And guess what? I love beets now. Well, I love roasted beets still working on the fresh ones. Baby steps, right?

And without further adieu, here are the recipes we made. Make sure to head over to Kim's blog and check out her other photographs as well as her take on all of this!

ROOT VEGETABLE AND SAUSAGE RAGOUT WITH CREAMY, CHEESY, GRITS click to print recipe

It started as this recipe from Whole Living, but I rarely follow a recipe verbatim. In reality, I kind of read something I like and then use it as a jumping off point based on what I have in the frig/pantry. This is a good example of that practice. Also, most of my stuff serves 2, because that's how I cook. There was extra here, but I'd double it if you were planning for 4.

Ingredients:

1 large onion

3 carrots

2 parsnips

1 potato (I used purple ones because they are pretty and I had them)

4 Brussels sprouts (halved)

2 beets (fresh ones. Nothing from a can here!)

½ teaspoon of granulated garlic (or finely mince 2-3 cloves of the good fresh stuff)

1 Tablespoon of extra virgin olive oil

14 oz can of diced tomatoes (or you can use a pint of cherry tomatoes if you happen to have them)

1 1/4 cup of low sodium stock (vegetable or chicken)

1 bay leaf

1 teaspoon each of thyme, rosemary, and parsley

½ teaspoon of balsamic vinegar

¼ lb ground sausage

creamy, cheesy, grits

salt and pepper

Directions:

1) Preheat your oven to 475 degrees Fahrenheit

2) Wash all the vegetables and then peel the carrots and parsnips (you don’t have to if you washed them well enough)

3) Dice all of the vegetables into large chunks and place in a bowl. Toss with olive oil and garlic and pour vegetables onto a cookie sheet.

4) Roast for 20-30 minutes, turning the sheet or stirring the vegetables halfway through the cooking time.

5) While the vegetables are roasting, cook the sausage until brown. (I’d suggest using a Dutch oven or a deep pan because later everything has to fit in this.)

6) Add the tomatoes and stock to the sausage and cook for 5 minutes on medium. If you’re using fresh tomatoes, mash them up a little to make more of a sauce.

7) Add the bay leaf, thyme, parsley, rosemary, and vinegar and cook for another 5 minutes.

8) Add a pinch of salt and a pinch of pepper. (You can always add more.)

9) Around this time you should start making your grits*

10) When the vegetables are finished, take them out of the oven (remember to turn off the oven) and pour them into the tomato and sausage mix and cook for another 3ish minutes. (Feel free to cook on low until your grits are done. It won’t hurt it.)

11) Take out the bay leaf.

12) Pour the vegetable and sausage ragout over the grits and serve immediately. Don't be afraid if there is a strong red color when you mix things. That's just beet juice. If that bothers you, roast the beets separately and add them on top of the ragout and grits instead of mixing it all together. I made this on Valentine's Day though, so it was kind of appropriate.

Side note about the grits:

I eat grits because I am from the South. If you aren’t, or if for some odd reason you don’t like grits, this would work with polenta too. To make them super creamy and cheesy and awesome, use half and half instead of water to make them. Add more than the package tells you to- you’ll kind of want to cook it like risotto in the fact that when it start drying out, you’ll add more half and half. In the end you’ll probably almost double the amount of liquid called for in the grit directions. As for the cheese, just mix is a large handful once they are finished cooking and then season with salt and pepper. (Grits ALWAYS need salt. Do not be afraid of adding salt.)

From the Studio: Love What You Do

via a beautiful mess

The wall above my computer is covered in inspiration things. It started as a confined inspiration board, but soon began spilling out onto the walls. From sketches, dried flowers, scientifically mounted butterflies, and old cards, to random photos, trinkets, drawing squares, and this flashing heart from the packaging of a wedding gift-it looks like my brain exploded across the wall.

Amidst the chaos, there are numerous quotes- one of which I wanted to share today.

Love what you do and it will love you back.

For me, that's proven to be so so very true. And on days where I'm balancing painting and paperwork and emails and phone calls it reminds me to step back and remember just how lucky I am.

Happy Monday everyone!

From the Studio: catching my breath

via here

Hey lovelies. I'm kind of battling a cold right now (and I say kind of because I refuse to admit I'm actually battling a cold right now) so I'll be taking the day off from the internet and spending it working on projects, drinking tea, and blowing my nose (sounded nice until that last part, right?)

Anyhow. I hope you all have a wonderful Monday and I will see you tomorrow! Oh! And thanks for understanding.

From the Studio: DIY Watercolor Valentine's

Every year I make my own Valentine's. Something about the glue and the glitter and the paint transports me back to the days of elementary school where every one makes a "Valentine Box" and gives EVERY single person in their class a card. (I know some people may think that it's annoying to have to give everyone a card, but I remember seeing how happy and surprised some kids were to get cards and it always made me smile.) And to be honest, unlike a lot of people, I love Valentine's Day. Not the whole "I have to buy you chocolates and a cheap card or else I don't love you" mentality sometimes adopted, but the idea that for one whole day you get to go overboard in showing how much you care about someone. Or someone's. My family is really big on Valentine's Day. Like wake up to a Valentine's Day celebration complete with presents before school kind of big. What can I say, we're saps when it comes to love. Anyhow, back to the point. Given that I make Valentine's every year, I thought I would show you all a creative (and really simple) way to make some for yourself. (I taught this trick to my Alt classes as a test run and it went really well so hopefully it does for you too!)

Step One: Get all of your stuff together. You'll need paper (I wanted an A2 sized card so my paper is 8.5"x5.5" but you can use whatever size you have) a watercolor brush, watercolor paint, a bone folder (or credit card. No reason to buy something you don't absolutely need) masking fluid and an old small paintbrush that you don't care if it gets ruined because it will. If you'd like to feel fancy, feel free to place some glittery hearts around- you know, for the mood.

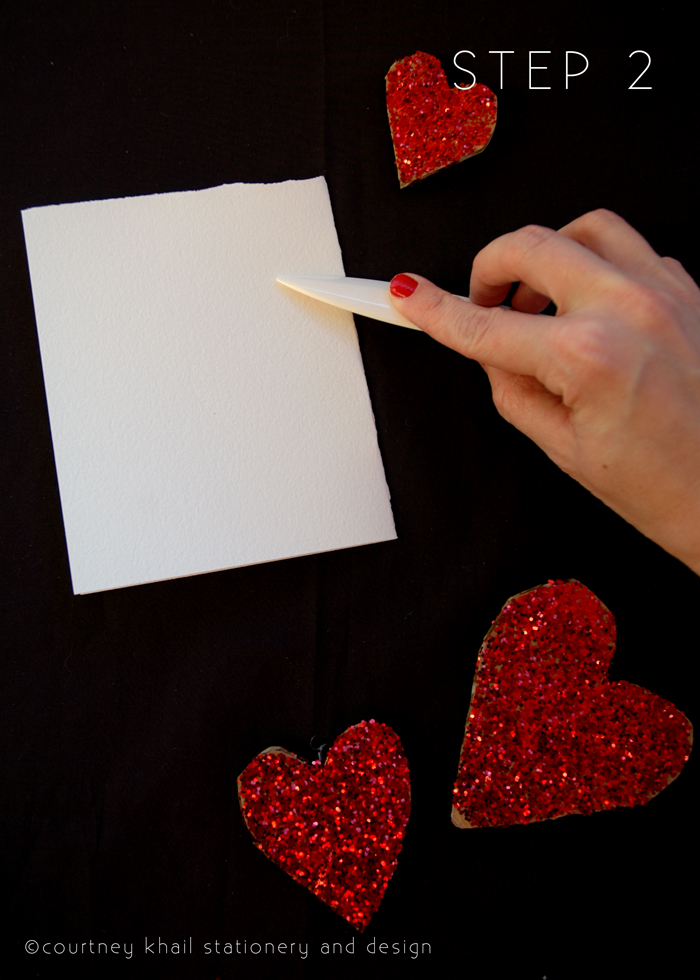
Step Two: Using your bone folder, fold your paper in half and crease the edges. I did a vertical fold, but horizontal would work well too.

Step Three: Using the brush you're going to ruin, paint a design on your paper using masking fluid. It doesn't need to be super thick, but you'll want to make sure the fluid makes a complete solid layer wherever you place it. I did X's and O's because my parents used to play tic tac toe over the phone when they were dating long distance and I always associate that with love and therefore Valentine's Day.

Step Four: After it has FULLY dried-test with the back of your hand never the front because it will leave oil behind and water and oil don't mix- combine a dime sized amount of watercolor paint with clean water and use that to paint over the entire design.

Step Five: Once the paint is completely dry, take a regular white eraser (or any eraser, I just like that you don't have to worry about color transferring with a white one) gently erase away the masking fluid. It should start acting a lot like rubber cement does when you rub that away. After the entire card is erased clean of masking fluid, dust off any left over residue.

Step Six: Step back and take a moment to admire your handiwork.

See? Super easy. And if you'd like, add some glitter, write a message inside and mail it off to a deserving loved one. I'd suggest in a pretty red or pink envelope because that makes it even more awesome to receive.

All photos copyright of courtney khail stationery and design. Feel free to re-post, but please give credit and be sure to link back to this post.